# Manage Bookings

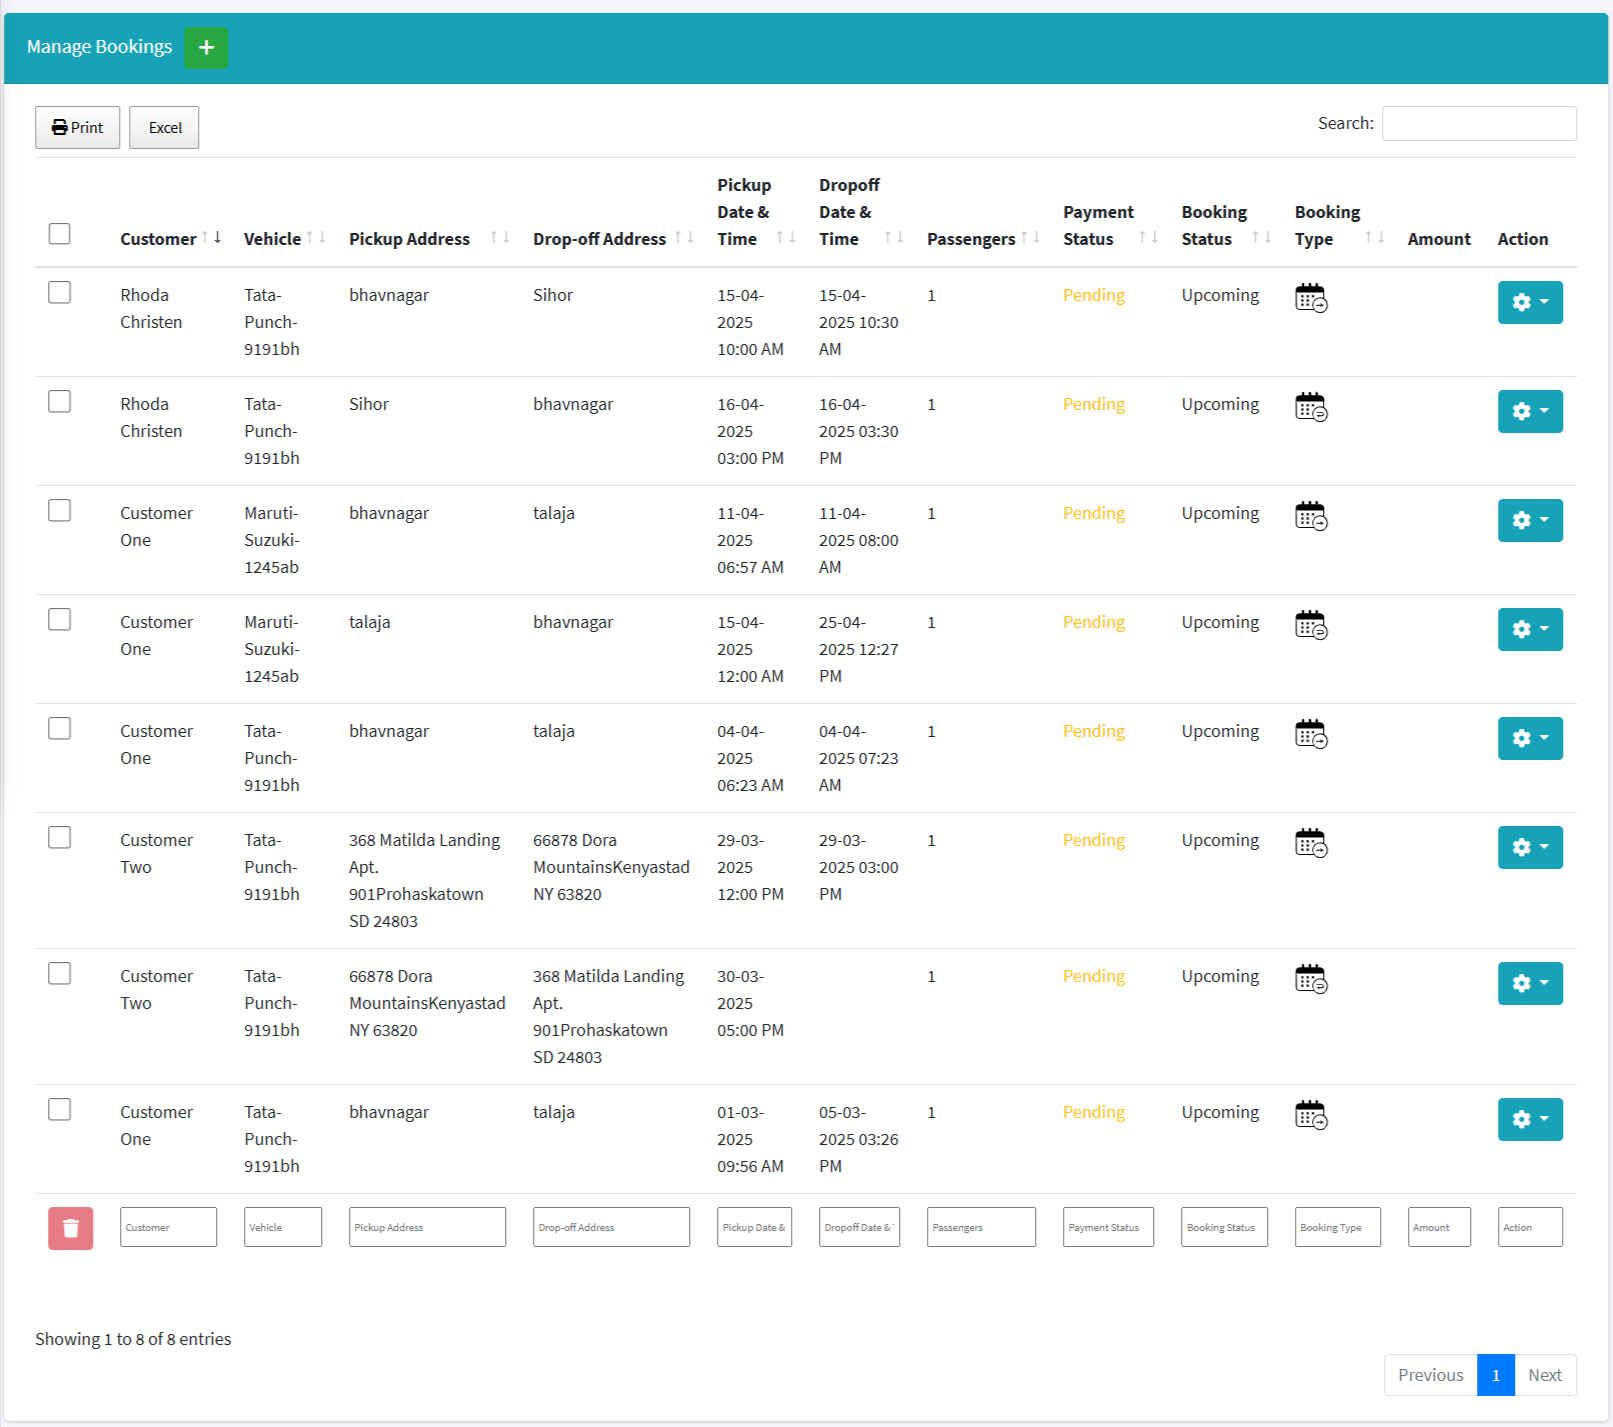
## A. **Manage Bookings**

**o**  The user can take a printout of the bookings

**o**   Apply search and multi-search

**o**  Add new booking with **(+) icon.**

**o**   Apply delete and multi-delete.

**o The user** can view different payment and booking statuses based on the action taken for each.

**o The** Admin can see the booking type, like Single or Round.

<figure><img src="/files/5M0i0MMbhROmnM8ArwfM" alt=""><figcaption></figcaption></figure>

## **B. Action -** <img src="/files/TsMQG8awMxpGpcDSkdb8" alt="" data-size="line"> **Setting**

<figure><img src="/files/8ObhrenCh8LO7jcCY4LN" alt=""><figcaption></figcaption></figure>

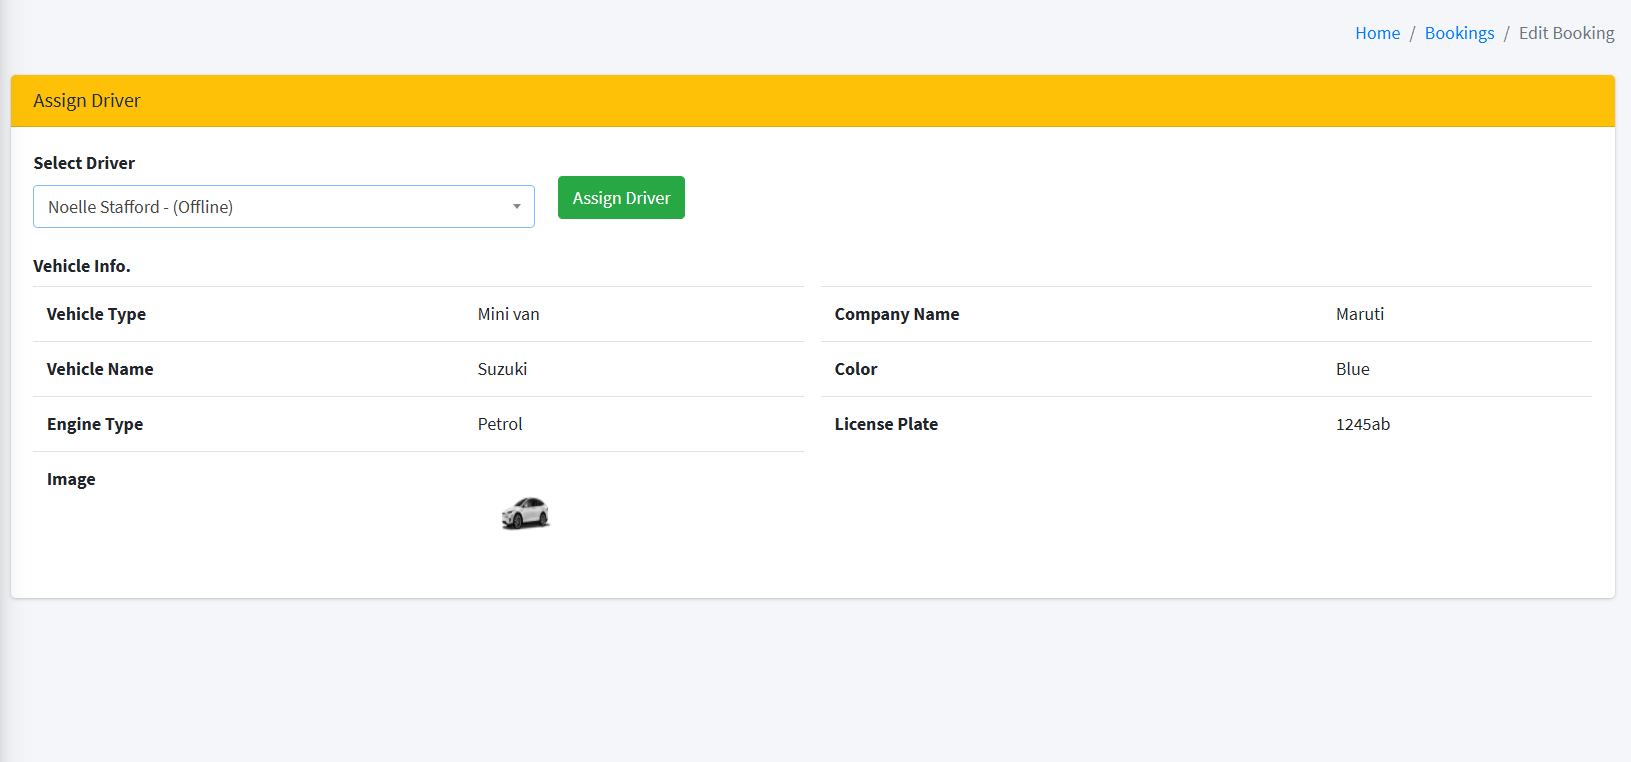
### Assign Driver

The admin user can easily assign a driver from here by selecting the driver's name. They can also view detailed vehicle information.

<figure><img src="/files/pClYRXDQV2XfysWte11h" alt=""><figcaption></figcaption></figure>

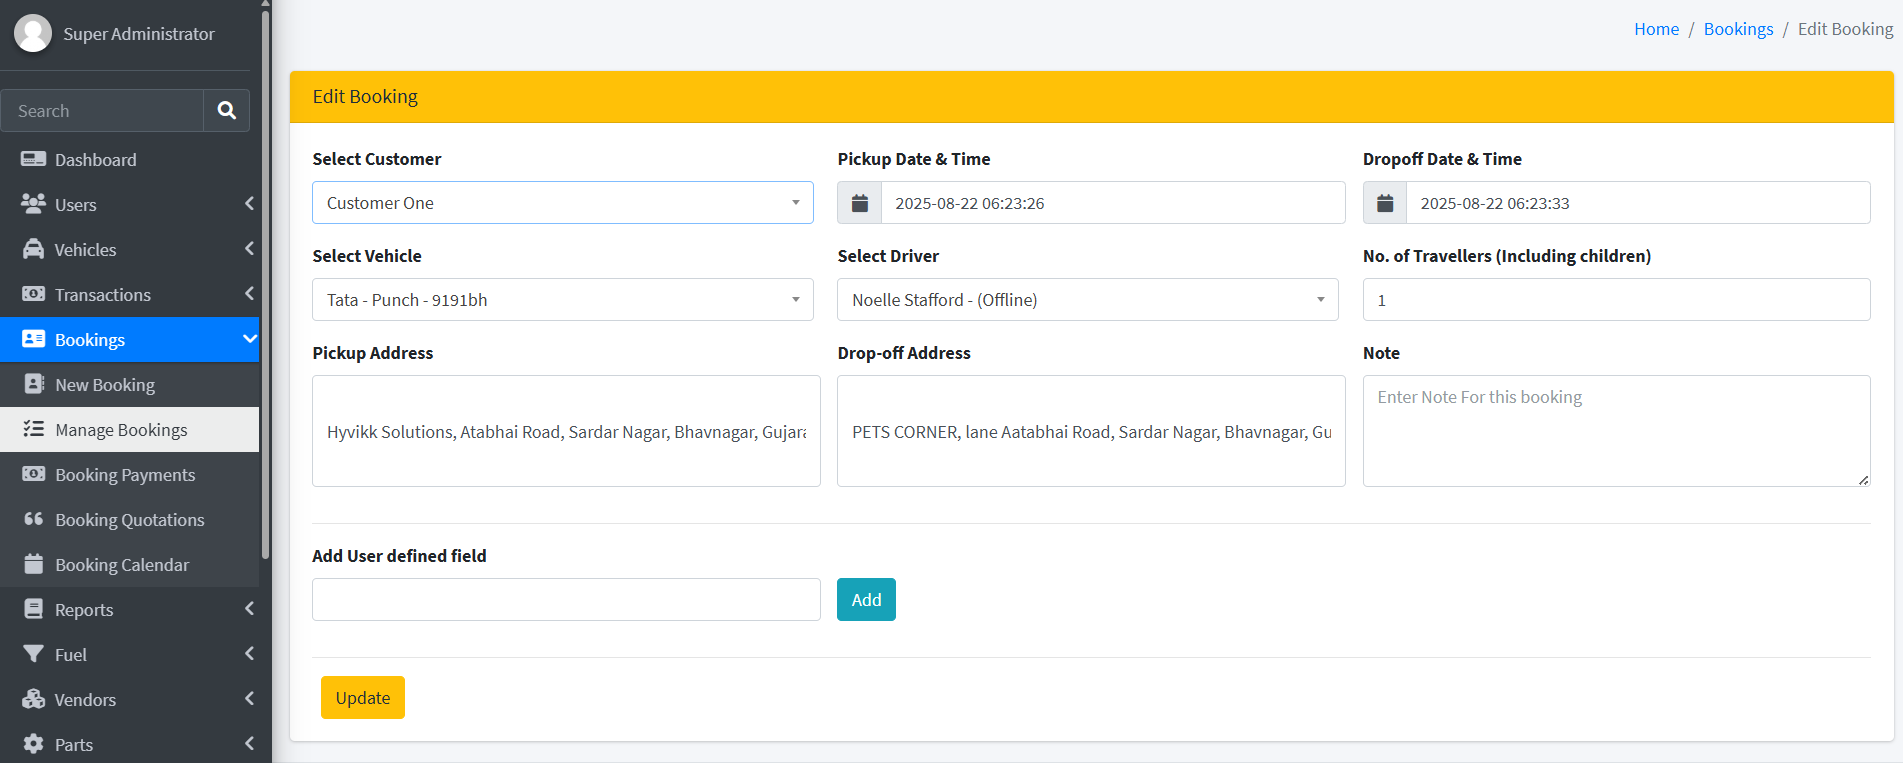
### Edit Booking <img src="/files/52W6Z0JFOR3GTKcyXzoJ" alt="" data-size="line">

The user can edit booking details from here.
<figure><img src="/files/lqaKnVsgCieSH9keusvl" alt=""><figcaption></figcaption></figure>

### **Cancel Booking**  <img src="/files/KVY4d7lhAAf5xPR9e5NA" alt="" data-size="line">

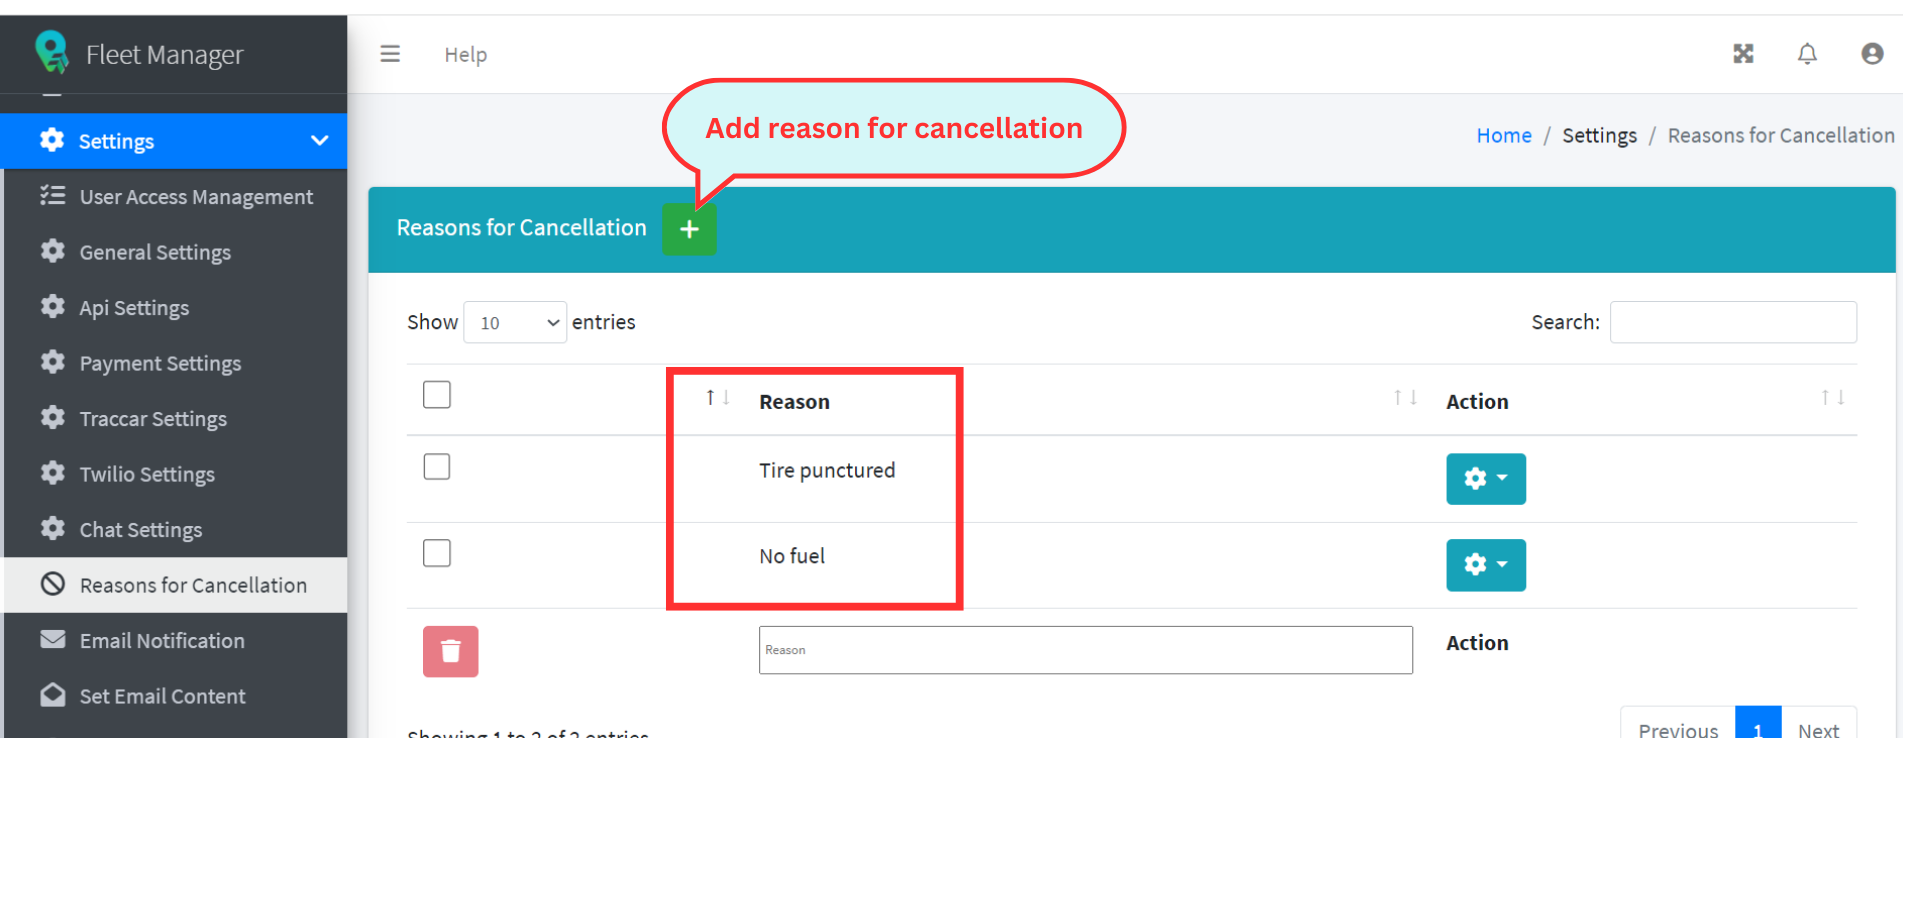
To cancel a booking, follow steps below.

**Step - 1**

First user is required to add reasons for booking cancellation from setting - reason for cancellation to cancel booking.
<figure><img src="/files/a5VHGnXauF17Q0y23hJB" alt=""><figcaption></figcaption></figure>

**Step - 2**

After completing the first step, admin can now view all the added reasons and effortlessly cancel their bookings.

<figure><img src="/files/p2RXxJb1idKteDWDL24V" alt=""><figcaption></figcaption></figure>

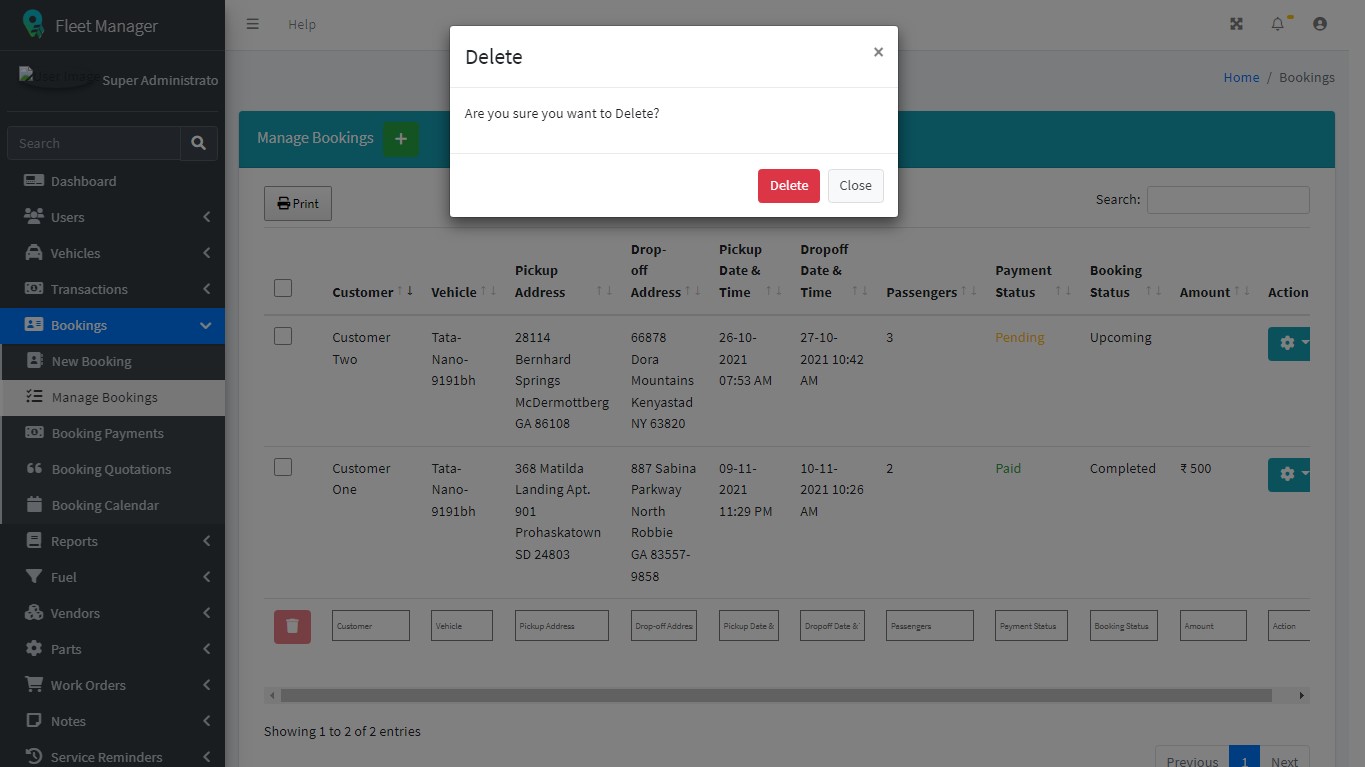
### **Delete Booking**  <img src="/files/EwWhQ4JB39wClLKNDb7q" alt="" data-size="line">

Admin can easily delete the booking from this action icon.
<figure><img src="/files/s45Fx3azbs5so1XyXs42" alt=""><figcaption></figcaption></figure>

### **Generate Invoice** <img src="/files/2YD7c6vW7SlDKj1alvpU" alt="" data-size="line">

Before adding details, the user is required to set some criteria from the settings module.

The image below guides the user to generate an invoice for a particular booking.

{% hint style="warning" %}
Once the invoice is generated by the admin, the customer will receive an email with the created invoice
{% endhint %}

**Image 1.**

<figure><img src="/files/unuhS5oyJkYXF34hLBeC" alt=""><figcaption></figcaption></figure>

### <mark style="background-color:green;">Notes</mark>

o   **Km (mileage)** - Displayed value (Km) guides the admin to decide the rate of ride; however, here, **10 km** can be modified by the admin while generating the invoice.

,o   **Waiting time (in minutes)** - Add waiting time (5 min here), and charges for an extra **5 min** would be added to the total amount.

o   **Tax charges** - Set tax charges from **Setting Module -> General Settings ( as displayed below in image 2)** because it cannot be modified by the admin directly from here.

o   **Amount** - Displayed amount (₹500) is the default amount, which is calculated on the basis of the data inserted in **Setting Module -> General Settings;** however, it can be changed by the admin directly from here if required.

**Image 2.**

User is required to set base or default charges according to the vehicle type, km & day type. Additionally, waiting charges are to be set per minute.

<figure><img src="/files/U8zI8fwmODzBk56kd8IV" alt=""><figcaption></figcaption></figure>

## Driver Availability

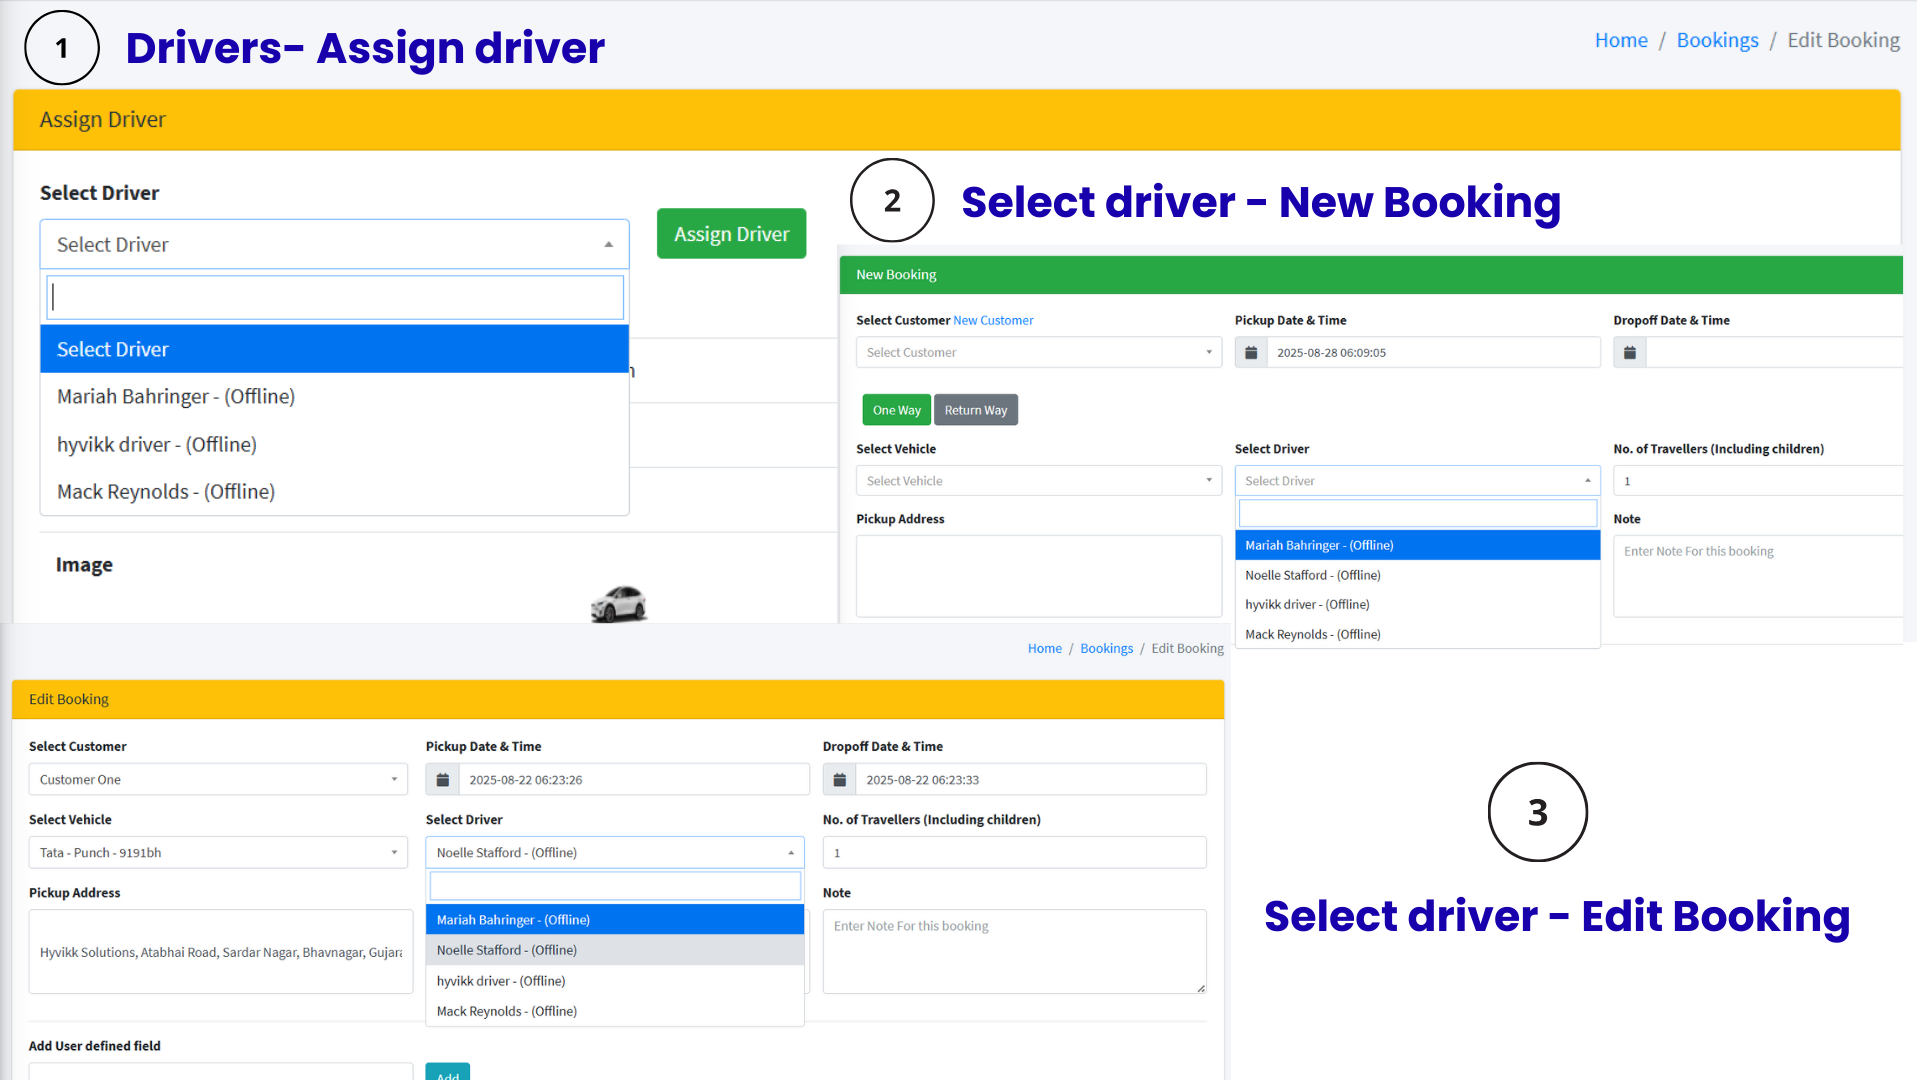
Driver availability is a feature that allows the admin to know whether a driver is free before assigning a booking. Once the driver updates their availability in the app, the admin can see it as online or offline. However, the admin can still assign the driver to a booking if needed.

### Image -1

Admin panel

<figure><img src="/files/PqrSXlkIvflmjBrGxxKx" alt=""><figcaption></figcaption></figure>

### Image -2

Mobile app

<figure><img src="/files/70PCAo0JOuALIBU3YjcV" alt=""><figcaption></figcaption></figure>

## How to calculate the booking price???

### Please watch the video to learn how the booking amount is calculated.

{% embed url="<https://drive.google.com/file/d/196HrBkzsULh1TYBCRTlOr-8vz7BFKLtm/view?usp=drive_link>" %}

## Let's understand with the explanation below!!!

In the fare settings, the admin has configured the pricing for the **sedan vehicle type** as follows:

* **Base Price:** ₹503 for the first **10 km**
* **Standard Fare:** ₹20 per km for any additional distance
* **Waiting Time Charge:** ₹2 per minute

### Example Fare Calculation for a 20 km Trip (Weekday, Sedan Vehicle Type)

<table><thead><tr><th>Particular</th><th width="267.0909423828125">Calculation</th><th>Amount </th></tr></thead><tbody><tr><td>Initial 10 KM</td><td>Base Fare</td><td>₹503</td></tr><tr><td>Remaining 10 km</td><td>10 km × ₹20 (Standard Fare per km)</td><td>₹200</td></tr><tr><td>Waiting Tim</td><td>2 min × ₹2 per min</td><td>₹4</td></tr><tr><td>Subtotal</td><td></td><td>₹707</td></tr><tr><td>Service Tax (12%)</td><td>₹707× 12%</td><td>₹84.84</td></tr><tr><td><strong>Total Booking Price</strong></td><td></td><td><strong>₹791.84</strong></td></tr></tbody></table>

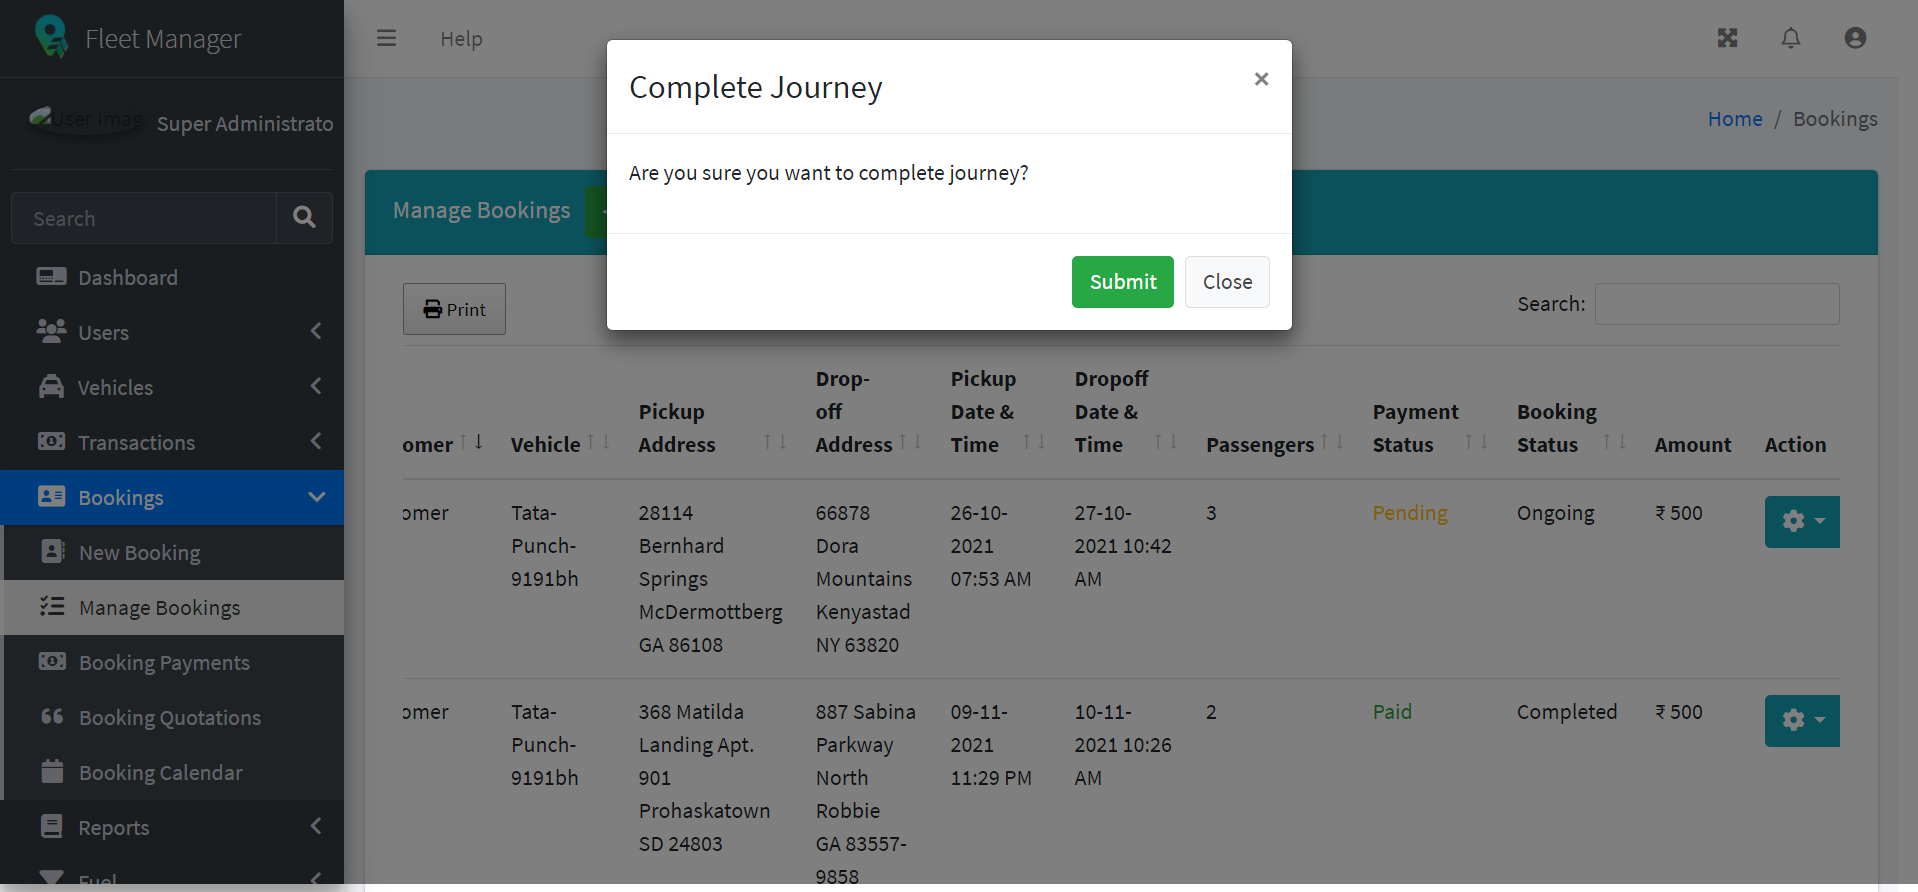
### Complete Journey

After generating the invoice, the admin can see two options, i.e, complete journey and receipt for completed journey.

<div><figure><img src="/files/k8oo3YEmLSdUUn2ZMr6x" alt=""><figcaption></figcaption></figure> <figure><img src="/files/d2G32G5ENVb5Avs1uXc9" alt=""><figcaption><p>Complete Journey</p></figcaption></figure></div>

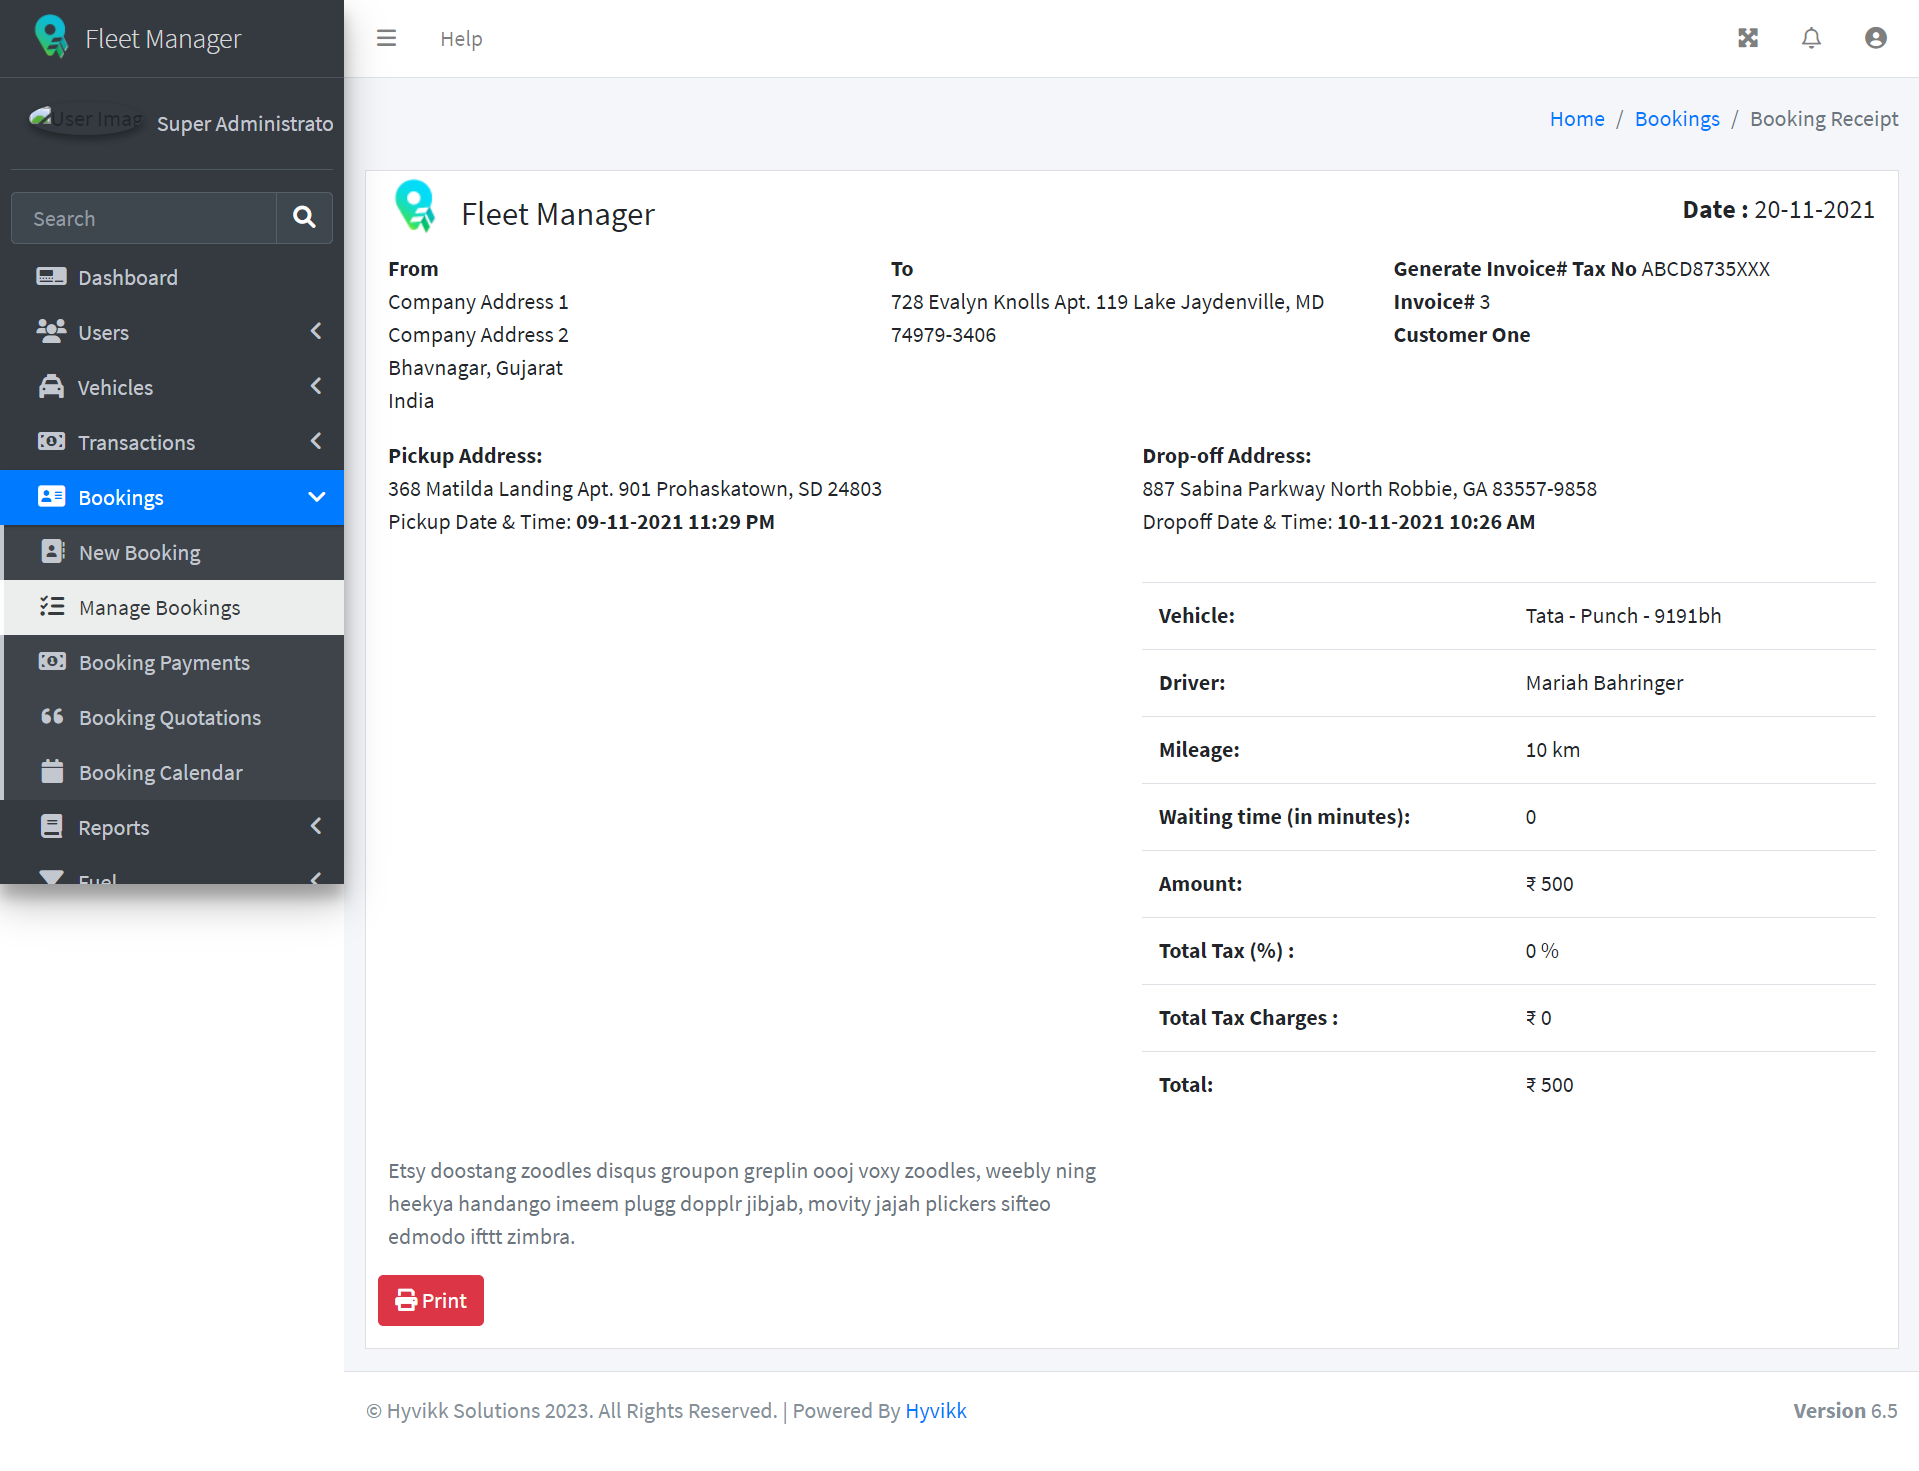
### Receipt&#x20;

Admin can generate a receipt for the booking once the ride is finished successfully.

<div><figure><img src="/files/sRUdjHMsxjk8gAb7mdvr" alt=""><figcaption></figcaption></figure> <figure><img src="/files/ZoJNUdWdKGyKAkl2RSoy" alt=""><figcaption><p>Receipt</p></figcaption></figure></div>

### Make payment

Once the invoice is generated, End (user can make payment for the ride.

<figure><img src="/files/Xx6TfpyVdg7nnDkg4eMV" alt=""><figcaption></figcaption></figure>

## Booking Status and Payment Status:

* &#x20;**Pending:** The booking has been created, but a driver has not been assigned yet.
* **Upcoming:** The booking has been created, and a driver has been assigned.
* **Ongoing:** The booking has been created, a driver is assigned, and the invoice has been generated (regardless of whether the payment is completed, an Advance payment from the customer, or not).
* **Completed:** The journey has been completed following the booking.

| Details                                                                                                                          | Payment status | Booking status |
| -------------------------------------------------------------------------------------------------------------------------------- | -------------- | -------------- |
| When a booking is created from the admin panel and a driver is assigned.                                                         | Pending        | Upcoming       |
| When a booking is created from the frontend and a driver is assigned.                                                            | Pending        | Upcoming       |
| When a booking is created by a customer from the frontend and no driver is assigned yet.                                         | Pending        | Pending        |
| When a booking is created by a customer from the frontend using the payment method (cash/Stripe).                                | Paid           | Pending        |
| When an invoice is generated for a booking with pending payment.                                                                 | Pending        | Ongoing        |
| When a booking is created from the admin or frontend, the ride is completed, but the payment is still pending from the customer. | Pending        | Completed      |
| When a booking is created from the admin or frontend, and both the payment and ride are completed.                               | Paid           | Completed      |

## **Travel Allowance - Manage Booking**&#x20;

Admin can add a new travel allowance request for the particular booking from the admin panel.

<figure><img src="/files/mKL0SAPR1hpIUe4XDyld" alt=""><figcaption></figcaption></figure>

**Add Travel Allowance**

* Enter Price – Add the applicable amount (e.g., 200, 500, etc.)
* Select Travel Allowance Type – from predefined options

<figure><img src="/files/ASO9WGU17QJfqZTkOnx4" alt=""><figcaption></figcaption></figure>

<figure><img src="/files/M7WjJJTajxcMMFewTv5N" alt=""><figcaption></figcaption></figure>

**Travel allowance requests are submitted successfully by the admin!!**

**Travel Allowance History & Approval**

After adding, the travel allowance request is shown in the Travel Allowance History, where it needs to be approved.

*<mark style="color:blue;">**Let’s move to the Travel Allowance Module to understand the journey.**</mark>*

**Click on the link to continue with the travel allowance process.**\
[Link To Travel Allowance Module](https://fleetdocs.hyvikk.space/explore-features/travel-allowance)


---

# Agent Instructions: Querying This Documentation

If you need additional information that is not directly available in this page, you can query the documentation dynamically by asking a question.

Perform an HTTP GET request on the current page URL with the `ask` query parameter:

```
GET https://fleetdocs.hyvikk.space/explore-features/bookings/manage-bookings.md?ask=<question>
```

The question should be specific, self-contained, and written in natural language.
The response will contain a direct answer to the question and relevant excerpts and sources from the documentation.

Use this mechanism when the answer is not explicitly present in the current page, you need clarification or additional context, or you want to retrieve related documentation sections.