> For the complete documentation index, see [llms.txt](https://fleetdocs.hyvikk.space/llms.txt). Markdown versions of documentation pages are available by appending `.md` to page URLs; this page is available as [Markdown](https://fleetdocs.hyvikk.space/explore-features/fuel.md).
# Fuel
## A.Add Fuel
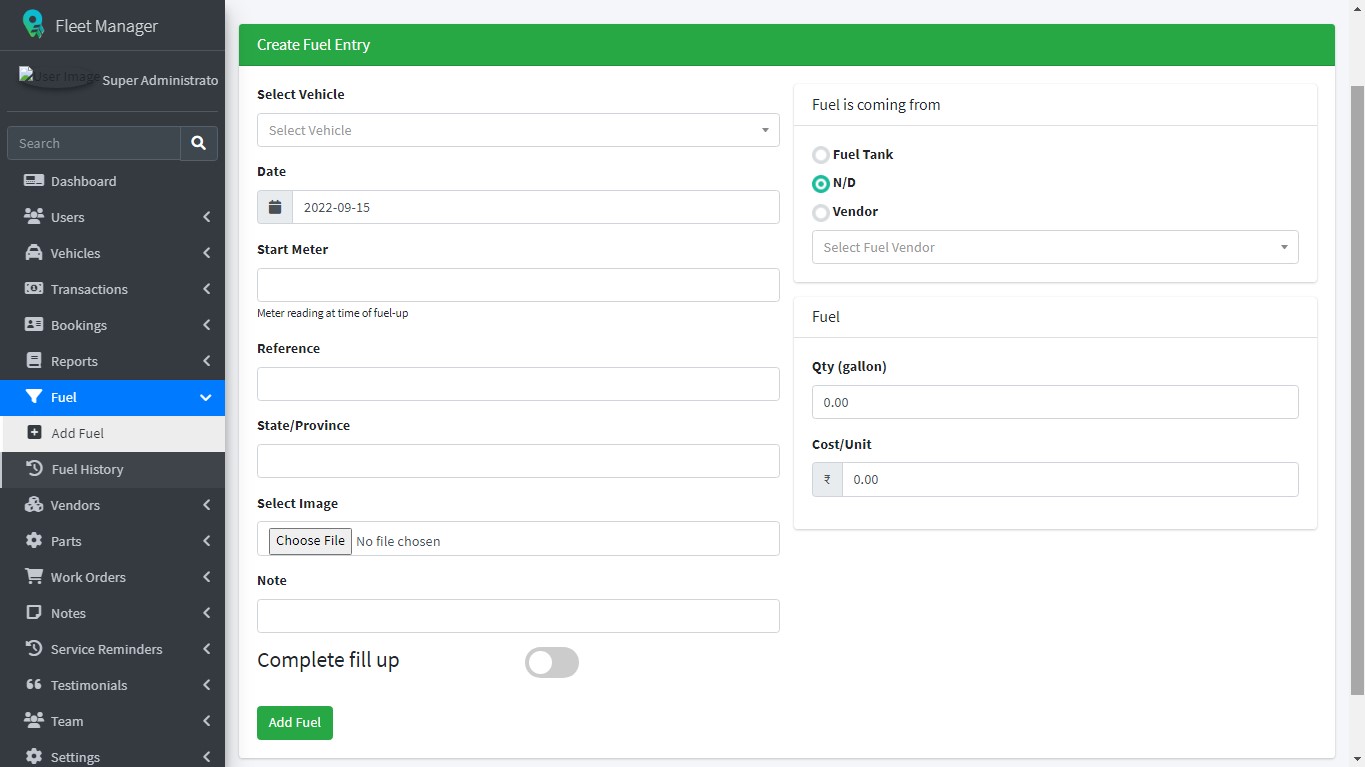
**Select Vehicle** - Only enabled vehicles are displayed.
**Date** - Enter date
**Start Meter** - Initial kilometre shown on vehicle before fuelling.
**State/Province** - Enter place name where you are fuelling.
**Select Image** - Upload image of vehicle if required.
**Fuel is coming from** – Select appropriate option. If vendor option is selected then select vendor name from the dropdown menu. (To see vendor name list, create vendors in vendor module first.
**Fuel Quantity and cost** – Enter Fuel quantity and cost.
**(Fuel Quantity Parameters is to be set from General settings.)**
**Note** - Enter Note if required
#### Fuel Entry - Fuel Unit Conversion
While adding fuel, if **E-Vehicle** is selected, the unit automatically changes to kWh, ensuring accurate energy tracking.
{% hint style="warning" %}
If an E-Vehicle is selected, the fuel unit will automatically change to kWh; otherwise, the fuel quantity unit will be applied as per the previously defined settings made from general settings (such as Litres, Gallons, or kWh).
{% endhint %}
## B. Fuel History
Fuel History
### **Fuel history includes -**
Add Fuel Entries
**o** Apply search & multi search
**o** Apply delete and multi delete
**o** Show entries ( 10,25,50 & 100)
## C. Action - Setting
### Edit Fuel History
Users can edit or modify the recorded fuel history by taking action.
Edit Fuel History
### Delete Fuel History
Users can delete fuel history from the records.
Delete Fuel History
### Reimbursement History
The fuel reimbursement module enables administrators to compensate drivers for fuel expenses incurred during active rides or bookings, ensuring streamlined management and better financial control.\
\
**Visibility Control - Admin panel >> General settings**
The Fuel Reimbursement option is visible to drivers or admin when the admin enables the Fuel Reimbursement setting. If disabled, the driver will not see the fuel reimbursement toggle button.
### **A. Fuel Reimbursement History**
The admin can view all fuel reimbursement entries added by the driver with complete details in the Reimbursement History section.
**Reimbursement Fuel Entries includes –**
* Apply search & multi search
* Apply delete & multi delete
* Show entries (10, 25, 50, or 100)
### **Features of Reimbursement History:**
* **Vehicle Image/Name** – Shows the vehicle image or name for easy identification
* **Added By** – Displays the driver’s name who added the fuel entry
* **Date** – Shows the fuel entry date
* **Quantity** – Displays the quantity of fuel
* **Cost** – Shows the total fuel cost
* **State/Province** – Displays location of the fuel entry
* **Reimbursement Status** – Shows two types of status:
**Accepted** – The reimbursement request is approved
**Rejected** – The reimbursement request is not approved
* **Payment Method** – A default method (Cash, Credit Card, Bank Transfer, UPI, or Cheque) is set and automatically reflected which were used for reimbursement.
* **Payment Date** – It shows when the payment was processed
### B. Action -  Setting
### **Edit - Fuel Entry**
The admin can edit recorded fuel reimbursement entries at any time by taking the appropriate action.
Edit Fuel Entry - 1
Clicking on **“Edit Fuel Entry”** will redirect to the edit fuel page, where the entry can be updated.
Edit Fuel Entry - 2
### **Delete - Fuel Reimbursement**
The admin user can delete recorded Fuel Reimbursement entries by taking the appropriate action.
### **Proceed for - Fuel Reimbursement**
Proceed fuel reimbursement allows the admin to process pending fuel reimbursement requests that have not yet been completed.
### **The Journey of Fuel Reimbursement / How it works!!!**
{% hint style="warning" %}
**The “Proceed to Reimbursement” option is available for the super admin to approve or reject reimbursement requests.**
{% endhint %}
**Payment Method Selection**
During processing, the admin can select the payment method from available options such as Cash, Credit Card, Bank Transfer, UPI, or Cheque
{% hint style="warning" %}
**The payment method is predefined and fixed; no additional methods can be added by admin from the admin panel.**
{% endhint %}
**Payment date**
Enter the date on which reimbursement is processed by admin.
**Request is accepted!!**
{% hint style="info" %}
**If the payment needs to be rejected, the admin simply has to click the “Reject” button, and the request will be cancelled successfully.**
{% endhint %}
### **Edit Fuel Reimbursement**
After processing fuel reimbursement, the admin can update fuel reimbursement.
Edit Fuel Reimbursement - 1
The reimbursement status can be updated to Accepted or Rejected again by taking the appropriate action, if required.


 Setting


.png?alt=media&token=bdde26e6-4547-42c0-b55c-dcfbb2344881)


